Scribe: Architecture Overview
This is a quick & dirty architecture breakdown of Scribe, a transcription application I built that could be used to transcribe any audio file & provide accurate speaker identification.

This is a quick & dirty architecture breakdown of Scribe, a transcription application I built that could be used to transcribe any audio file & provide accurate speaker identification.
It is part of an on-going series of reviews resulting in my Burn It Down initiative.
Problems
The application concept is straightforward enough, but as with any application you quickly run into problems that you didn't think about. During the POC phase, I identified a couple of core problems that helped drive the technology choices for the project.
- Inconsistent Audio Formats: Audio files come in various sizes & formats, so our system needs to be able to handle all of the various types & provide a transcript to the user as quickly as possible.
- Inconsistent Audio Length: Starting with smaller files, you wont notice any performance problems with the application. However, when trying to transcribe full hour long podcast episodes I encountered a number of problems ranging from OutOfMemoryExceptions when trying to convert the audio format to file size restrictions by the third party transcription providers.
Solutions
Luckily, there are a number of audio conversion libraries for .NET that already solve these problems.
I ended up going with NAudio, an open source audio library. It had the best documentation & offered code examples for converting from a range of different formats to WAV as well as how to chop larger files into multiple smaller ones & still work effectively with them.
Technology Choices
Language
There wasn't much of a deliberation about which programming language to use. I am a .NET developer by trade, so I opted to build as much of Scribe in .NET Core as possible. Though, there were a few areas (outlined in the Container Diagram below) where using the full framework was required.
Hosting
For hosting I wanted to be sure that I was able to scale as much as necessary (you never know when you will have a surprise success) while also not going broke. This screamed "serverless" & I settled on using Azure Functions over AWS Lambda. While Lambda is cheaper overall, using Azure is a much easier experience from my CI/CD platform of choice: Azure DevOps.
Side Note: If you haven't ever used it, Azure DevOps is 100% for teams of up to 5 people with unlimited private repos, builds, & deployment pipelines. It is definitely work checking out.
Data Storage
There are a couple of different pieces of data that needed to be stored for this application, each with different structures & needs. The four main categories of data that needed to be stored were; user account data, transcript text, transcript speaker data, & transcription job statuses.
Because I was using Microsoft's Identity Framework & I didn't feel like writing throw away data adapters, all user data was managed in SQL Server with Entity Framework used for the repository layer in the code.
Transcript text started out as raw text files, but as the needs of the application evolved I began needing a more rich data structure to represent the transcript. I defined a JSON schema that could include the transcript text, speaker labels, speaking timestamps, & revision history for a given word or phrase. To store that JSON I used Azure Blob Storage which is a fast storage solution for unstructured file data hosted in the cloud.
I opted for using Blob Storage over CosmosDB based only on cost. I didn't have experience with either of them & at the time CosmosDB had an outrageous price tag.
There was a need to store some relational transcript data for things such as user ownership & transcription job status. For that data I piggy-backed the SQL Server that was used for the user data. This was more efficient then trying to query the Azure Blob Storage for file metadata, although CosmosDB is pretty good at that. That would probably be migrated if I were to create this project today.
Speech-to-text
There are a lot of different speech-to-text technologies out there. Azure, AWS, Google Cloud, & IBM all three have offerings with various pros & cons. At the time of development, the IBM Watson offering had more of the features that I was looking to utilize.
- Async Processing: With IBM, I was able to provide a callback URL for the transcript to be delivered to when it was complete. This could be done either all at once, or piece by piece as the results were available. I prefer this approach opposed to needing to keep the process running & waiting for a response from the transcription provider due to the costs associated with executing in a serverless capacity.
- Speaker Recognition: Both IBM & Azure offered speaker recognition functionality, the key difference being that IBM was able to do speaker recognition & speech recognition simultaneously, where Azure required multiple calls to multiple services to solve the same problem. It's worth noting that Google also performed speaker recognition simultaneously, but at the time the results were questionable at best.
Front End
For the user interface I stuck with what I know & used ASP.NET Razor pages. Using that technology ensured I would stay productive on adding value to the application instead of trying to learn a new technology, such as Angular or React, while also building a new product.
The styling was done via Bootstrap using the Yeti theme from Bootswatch.
User Communication
There were cases where I would need to be able to communicate with the end users about various things like; sending password reset links or alerting them that their transcript was available. Email seemed like the most logical solution for both of these.
I already had a SendGrid account sitting idle from previous projects, so I just generated a new set of API keys & used their SDK.
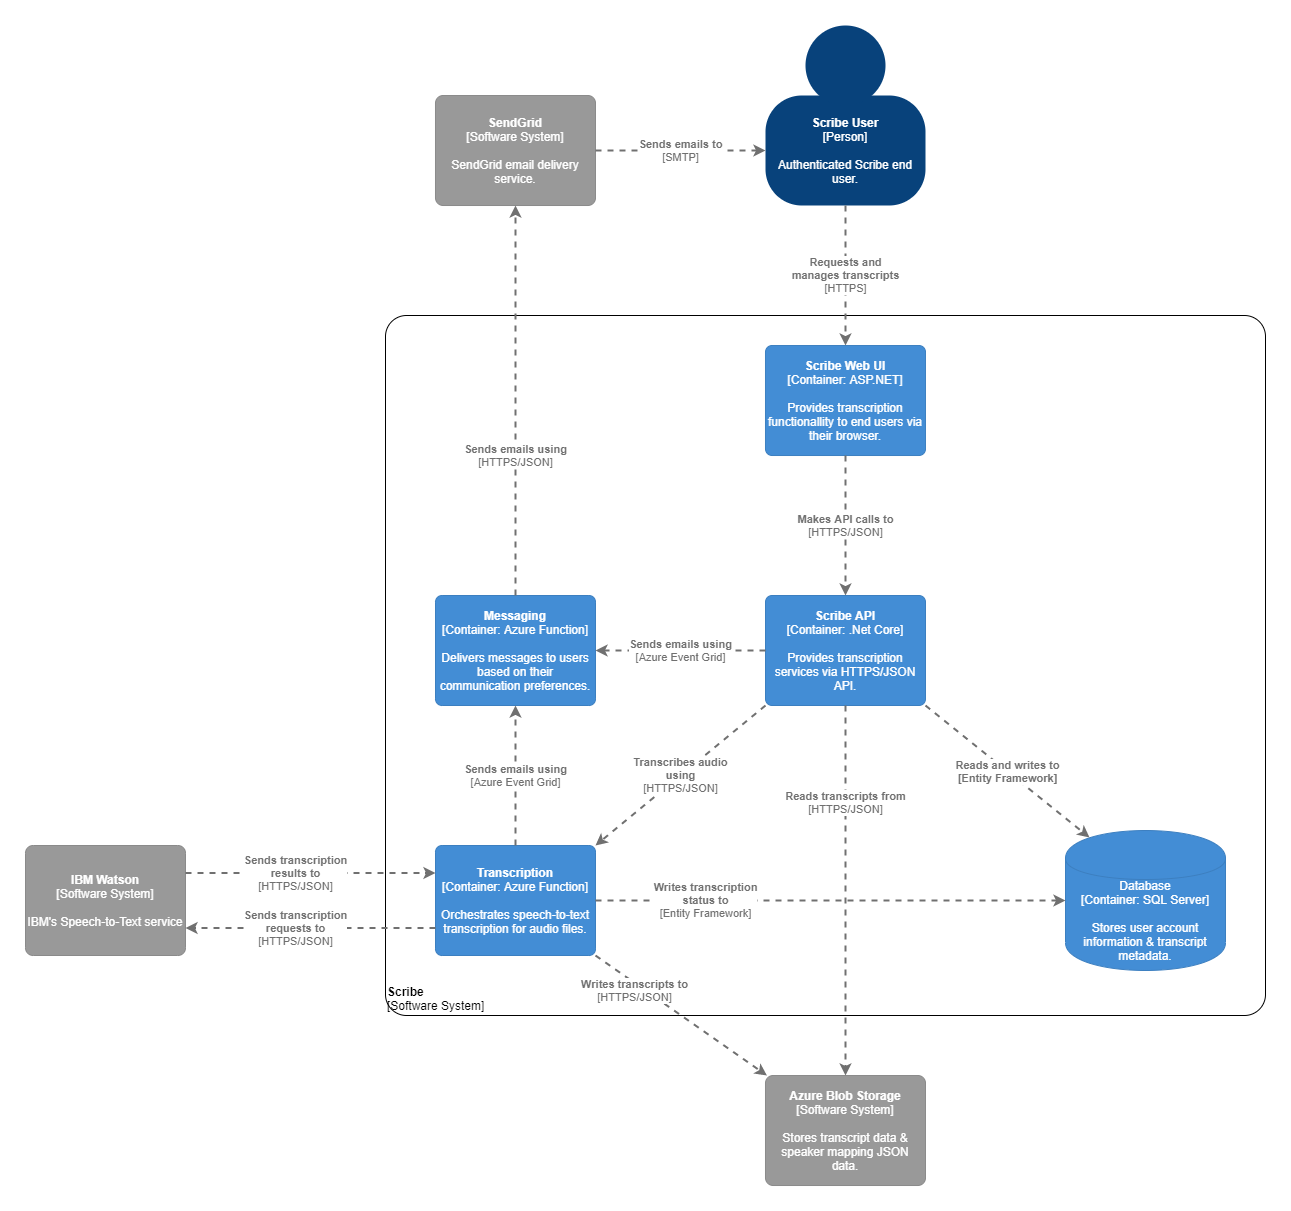
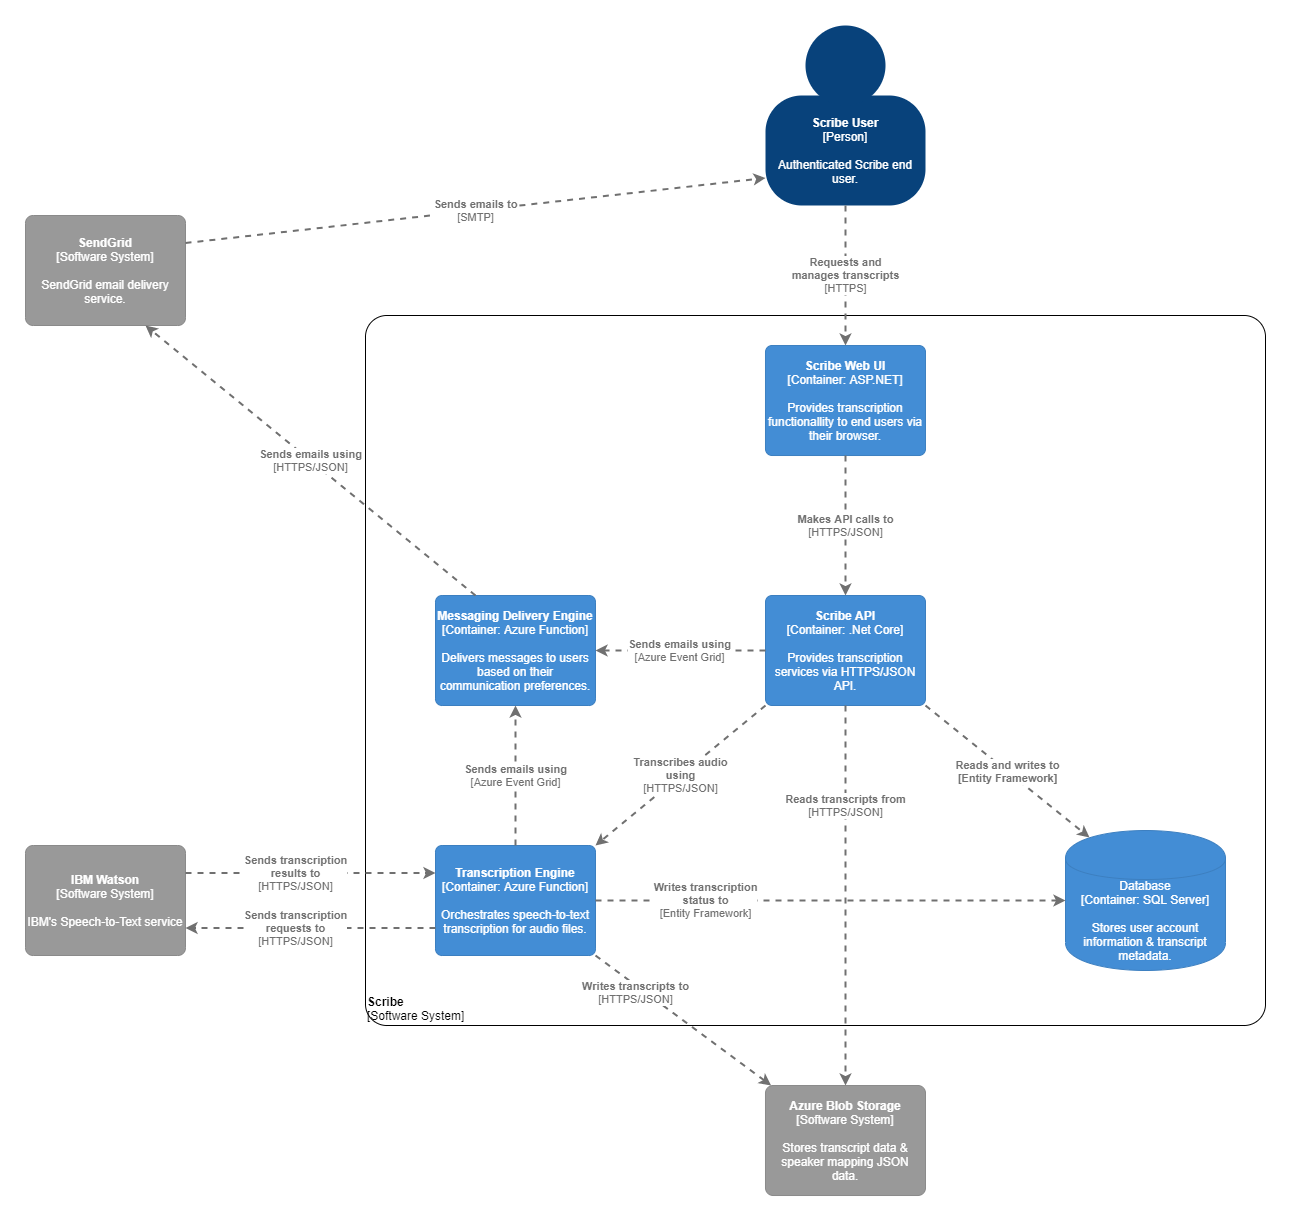
Container Diagram
This diagram is meant to show the Scribe application with context about what the different pieces are used for & how they interact.
While the Container diagram gives a good 10,000 foot view of the application, it is more useful at times to dive deeper into a single component & see how different pieces of code & services interact. Here is a Component Diagram for the Transcription portion of things. Imagine you clicked on the blue box on the bottom left hand of the previous diagram for a closer look.
Here we can see exactly which services were responsible for which function of transcription. This isn't an all encompassing view, there is a factory used to determine which Audio Converter should be used by the audio conversion engine for example, but it gets us closer to the real picture.
If we were to dive into the specific steps required for audio transcription via a BPMN diagram, it would look something like this.
Here we can see each individual step the audio will go through during the transcription process as well as how various known errors are handled. This document is detailed enough that anyone should be able to read it & get a firm understanding of exactly what is going on during audio transcription.